Updated August 06, 2012
This is the first post from a series of WordPress tutorials, in which I will try to make it easier for your to install and manage a WordPress website.
Right now, I would like to start from the beginning,and the beginning means installing WordPress.
If you would rather hire someone to do it for you, then you can check one of our packages tailored exactly for your needs on WP Backpack.
But, if you want to do it yourself, here is how you can do it. To install WordPess you can choose from:
- Manual installation, which requires some technical knowledge and more time
- Automatic installation, which can be done with a tool called “Fantastico”, available in your web hosting panel
If your web hosting makes available for you Fantastico, then you can choose the easy way and go for the 5 minutes installation of WordPress.
Otherwise, you can take the long way and have it ready in less than half an hour. But don’t worry, I will make this article clear enough to handle this much more easier.
So, let’s dive into it.
I. Manual WordPress Installation
For a different angle on how to install WordPress you should also check out the How to Manually Install WordPress article on WP Backpack.
The manual WordPress installation requires a little more time and technical knowledge that the automatic installation. However, you can easily do it by following the steps outlined below.
1. Download WordPress
Start by going to the WordPress.org website and download the WordPress installation file.
To download it, just click on the “Download WordPress” button and save the archive on your computer. Make sure you remember the location of the file.
2. Extract the archive
Once you finish downloading the installation package, use your preferred software to unzip the archive. Save the directory on a location of you computer where you have easy access.
3. Create a MySQL database
It’s time to get into more technical stuff.
Log into the control panel of your web hosting provider and create a MySQL database for your WordPress installation.
Look for the [Databases] section and select [MySQL Database Wizard].

Here you will need to create a name for your database, along with a username and a password. Make sure you note them in a safe place, because you will need them later to configure the WordPress installation.
For example, you can use:
- Name: wpdb
- Username: wpuname
- Password: [make sure you have a strong password but easy to remember]
Once you create the database, username and password, grant all the privileges to your user for the database.
And this is all for the database creation. It wasn’t that hard, was it?
4. Add Database information to the WordPress Config file
Next, you need to add the database information in the WordPress config file. To do this, just navigate to the unzipped directory that contains the WordPress files and look for the [wp-config-sample.php] file.
Open that file in your preferred word editor, get the information for the database you just created and add it to the file. To do this, look for the code below replace the [database_name_here] with the name of your database, [username_here] with the username assigned for your database and [password_here] with the password assigned to your user.
/** The name of the database for WordPress */
define(‘DB_NAME’, ‘database_name_here’);/** MySQL database username */
define(‘DB_USER’, ‘username_here’);/** MySQL database password */
define(‘DB_PASSWORD’, ‘password_here’);/** MySQL hostname */
define(‘DB_HOST’, ‘localhost’);
Once you finish this, save the file, but save it as [wp-config.php] and go to the next step of the WordPress installation: uploading the files to your web hosting server.
5. Configure your FTP application
But before that, let’s make sure you understand how to do it.
In order to upload the files on your web hosting server, you will need a FTP application. You can use any FTP software, but the most popular is FilleZilla, which can be used on Windows, Mac or Linux.
So, install and FTP application and get your hosting details to connect to the web hosting server. You will need:
- Host name: in most cases this is [ftp.yourdomainname.com]
- Username: here you will need to add the username you’re using to connect to your web hosting control panel
- Password: this is the password you’re using to connect to your web hosting control panel
Now that you are connected to the server, let’s go further and upload the WordPress installation files.
6. Upload the WordPress installation files.
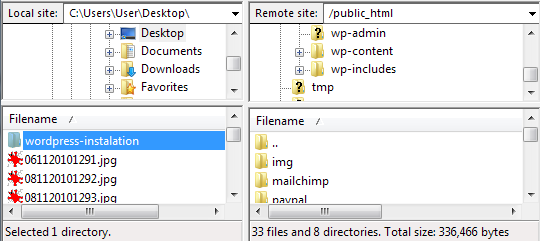
In the FTP application, make sure you are in the [public_html] directory on the [Remote side]. Now, just select all the files from the [wordpress] directory on your computer and drag them over into the [public_html] directory.
Adding the files into the [public_html] directory will make your website available from [www.yourdomain.com].
If you already have a website and you want to add a blog to it, create a new directory and place the files there. This way, you will install WordPress in the subdirectory and the blog will be available from [www.yourdomain.com/subdirectory/]
However, if you host or plan to host multiple websites on your server, then it makes sense to create a subdirectory for each WordPress installation.

7. Run the WordPress installation script
The final step of to install WordPress is to run the installation script, which is available either from your domain name, if you installed WordPress in the [public_html] directory, or from [www.yourdomain.com/subdirectory/], if you installed WordPress in a subdirectory.
Here you have to enter the name of your website, login information and your email address.
And once you’re done with this step, you finally installed WordPress “the hard way”. Kudos to you!
But you see that wasn’t that hard. Was it?
II. Automatic WordPress Installation
If you are lucky and your web hosting provides gives you access to Fantastico, then this is an easier way to install WordPress.
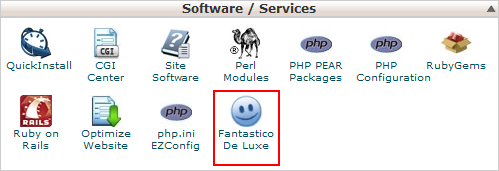
So, look for the Fantastico application on your web hosting server and launch it.

From the left menu, select [WordPress] and then select [New Installation].
At the next step, add the information you want to use for your website and you are all set. Just configure admin access data, username, password and email address, hit the [Install WordPress] button and your site is successfully installed.
And this is it. You just got yourself a WordPress website.
Your turn
I did my part of the job, and here it comes yours. If you have questions or comments, speak your mind in the section below!
Photo credit: Vero Pepperrell
What do you think is important in regards to security when doing a fresh install? I know its important to change login from admin, but can you recommend other things?
Hi
Found this to be very helpful until I got to the ftp part.
I have a website but am afraid if I upload the wordpress files it will affect my website.
Can you please explain how to create a sub directory for WordPress so that it won’t interfere with my website files?
thanks
carolyn
Carolyn, just install it in the sub directory.
Most people use one called “blog” and if you upload everything there, you will be fine.
While you are on the FTP, on your main page, right click and select “Create directory”. Then, you will be all set.
Let me know how it goes.
Thank you so much for writing this post. It took me almost 13 days to complete, but I’ve got my new wordpress website up and running. Thank you Eugen Oprea! You are the man!!!
Hey Harry, it’s good to hear that my instructions helped you setup a blog.
Well done!
This is one of the best articles so far I have read online. No crap, just useful information. Very well presented.
Thanks!!
I did the quick version using Fantastico and it took no time. I’m used to Word Press with several other websites that someone created for me and I update. This Fantastico download was so quick it was easy… only draw back I only see 2 themes for use. Twenty-ten and twenty eleven are the only two available… I can live with that for my Blue Spruce Publishing website, but just thought I would advise. Thanks for the very easy directions.
Thanks for finally talking about >How to install WordPress in 7 Easy Steps – Manually or Automatically – Eugen Oprea <Liked it!
Hi, thanks for your nice tutorial. i just installed WordPress on my server. its seems easy for me to install in Cpanel. but my previous host was in EHCP Control panel. so. i was confused.
Hi Eugen Oprea
Your article is very simple and more effective. I’d follow every steps very easily and successfully implemented my wordpress 🙂
Thanks for sharing a great article.
Sandeep
I want to install it in my local server.what are the steps??