Have you ever checked your Google Analytics traffic and noticed a high bump? But, was that bump visible right when you did some work on your site?
I know, it happens to all of us. There are periods when we setup something new on the site, work on design or spend a lot of time checking the articles we write. All these count as visits, time is recorded and you end up with inaccurate stats for your website.
So, you need to filter out all the admin traffic from Google Analytics. You can do this with different WordPress plugins, but what if you don’t use WordPress or just don’t want to clutter your site with plugins?
In this case you can do it straight from Google Analytics and here’s how:
Google Analytics allows you to filter traffic using 2 methods:
- By excluding your IP address.
- By excluding traffic by Cookie Content.
The first method is very effective when you have a static IP address and a desktop computer that doesn’t move to a different IP address.
In case you have an IP address that is dynamically generated or if you work from a laptop and spend a lot of time in coffee shops, on client sites or when vising friends, then the second method is way more effective. You wouldn’t want to start hunting IP addresses from everywhere, don’t you?
Each method has it’s advantages and disadvantages, so let’s see which one suits you needs and how to set it up.
1. Exclude your IP address
This method allows you to set it and forget it. All the traffic from a specific IP address or an IP range will be excluded starting with the time you set this up.
However, if you use a laptop and leave your office/home often, this is not effective anymore, so you might want to use the second method.
To exclude traffic by IP address you will need to create a custom filter in Google Analytics that will instruct the Google Analytics application to not take into consideration the traffic that is made from a specific IP address or a range of IP addresses.
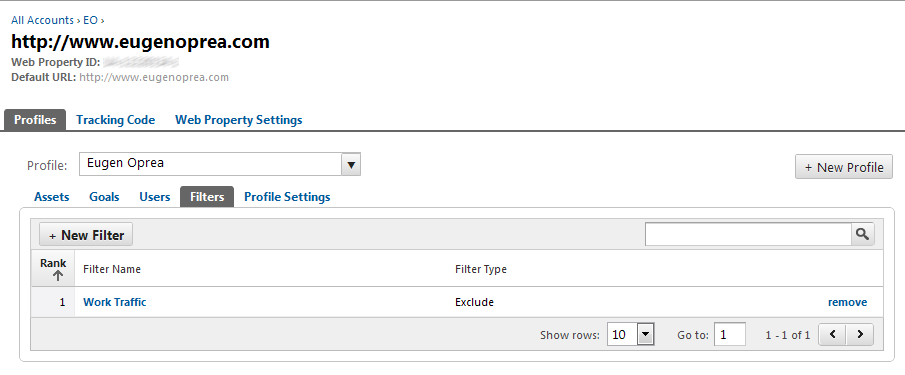
So log into your Google Analytics account, click the settings section from the top right section and select [Filters].
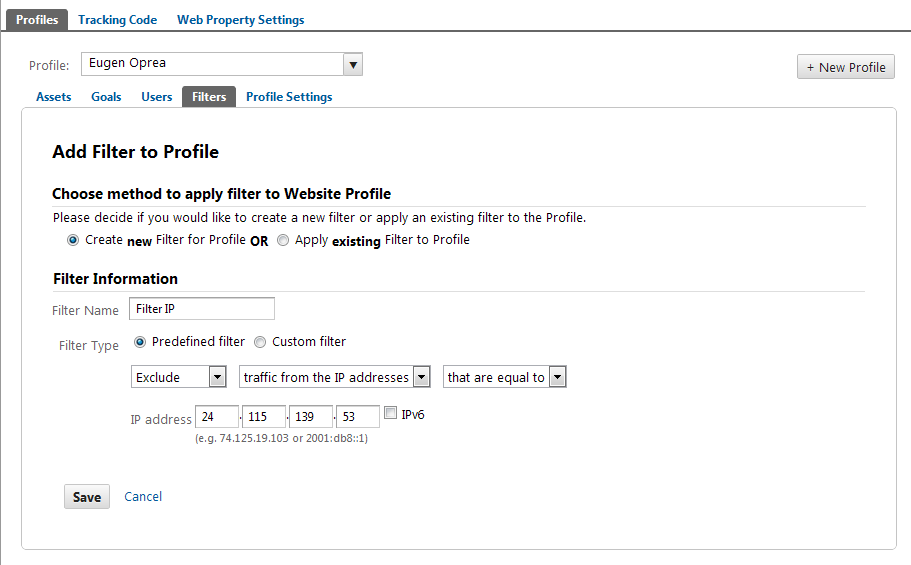
Now press the [New Filter] button and start to add information about your new filter:
- Filter Name – add a name for your filter
- Filter Type – select [Predefined filter]
- Next, select [Exclude], [traffic from IP addresses], [that are equal to]
- IP address – add you IP address in those fields (e.g. 24.115.139.53).
In case you have a range of IP addresses that you are looking to filter, then you can use this tool to generate a regular expression.
Finally, press the [Save] button to add the new filter to your Google Analytics profile.
2. Exclude traffic by Cookie Content
By excluding traffic using the cookie content method, the filter is not locked to a single IP address or a range of IP addresses.
However, the downside is that if you change your browser, reinstall your operating system or clear your cookies, your traffic will be tracked again.
But let’s see how you can setup this method and what you need to do to make sure that your traffic is still excluded.
Cookie Page
First you need to create a file that will add the cookie to your browser. To do that, just create an HTML file called [filter-traffic.html] and add the following content to it:
This part starts the HTML document and instruct the search engines robots/spiders to not index this content. This is important because you will not want visitors to come to this page, as they will be excluded from your statistics.
The above part contains the Google Analytics code, but make sure that you replace that account number with your own one.
Finally, add the rest of the code along with some instructions for your colleagues/employees.
As you can see the body tag contains a JavaScript that will set a custom variable which will be later filtered in Google Analytics.
Save this as a basic HTML document and add it somewhere on your server through FTP in a location that can be accessed easier from your browser. You can add it to your root folder.
To make it easier for you, I added the page in an archive for you to download. Just click here to download the archive.
Next, extract the [filter-traffic.html] page from the archive, add your Google Analytics account number and copy it to your server. I didn’t linked directly to the page, because I don’t want the cookie to get on your browser.
Before going to the next step, visit the page you just added on your server from all the browsers that you are using and all your computers.
Please note, that if you clear your cookies, reinstall your browser or Operating System, you will need to access that HTML page again.
Add a filter to your Google Analytics account
Now that you have the cookie in your browser, you need to setup a filter that will exclude the traffic coming from your computer.
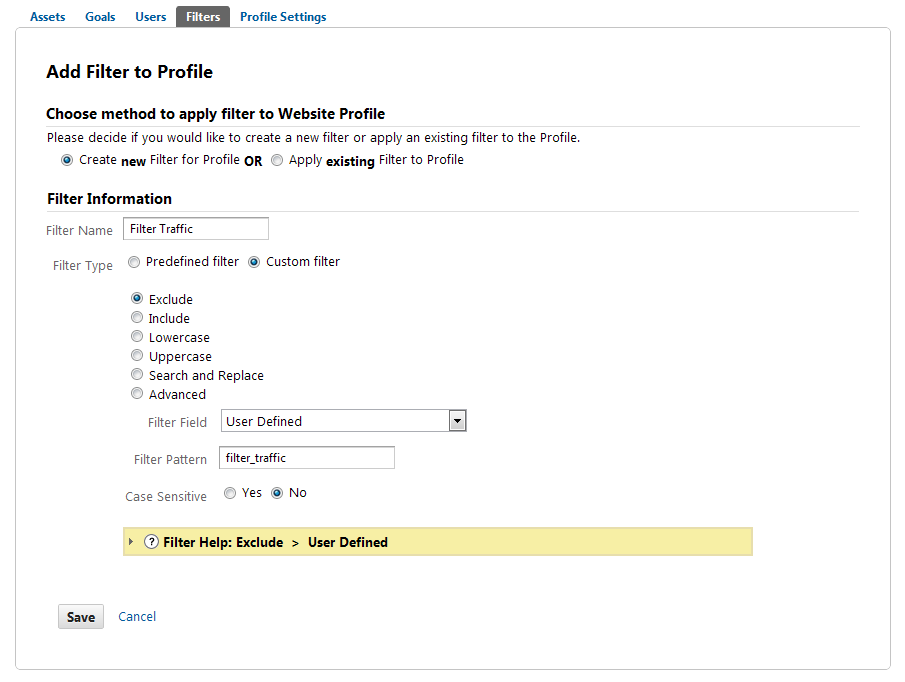
Go again to [Filters] in your Google Analytics account and this time, select a [Custom filter].
Select [Exclude] to exclude traffic, [User Defined] as [Filter Field] because the you are setting the custom variable and add [filter_traffic] to [Filter Pattern].
[filter_traffic] is what we have used as a custom variable in the body tag of the HTML document.
Finally, click the [Save] button to save your filter.
Very important it’s the fact that this method actually excludes the data from your Google Analytics account. If you think that at a moment in time you will want to analyze internal traffic, then use the Cookie Page option, but DO NOT apply a filter. Instead, use custom segments to do it. You can learn about custom segments in my Google Analytics course.
Now, you should be all setup with a filter to exclude the traffic from your computer while editing the site, working on the design or checking your own articles. Even if I hope that the process will run smoothly, do let me know in the comments section below if you have any questions.
So, let me know how the process went and if you have any questions. Use the comment section below to do it.


In your ‘Cookie’ code snippet you appear to use the wrong quote marks.
Should it not be…
meta name=”robots” content=”noindex”
instead of
meta name=”robots” content=”noindex”
…hmmm… now that’s strange…
In my comment above it shows them as the same…but theye are different when they were in this editing box (and when I copied and pasted the code from the archive file supplied)
I will check the archive, but please use the default quote marks in the meantime.
Eugen
Hi Eugene,
I am not able to see ‘In-Page Analytics’ data for .swf Banners, Outbound links, GIF links….what may be the reason?…I use a content management system and all settings are enabled to track these….
A
Adarsh, I suspect that Analytics might not track .swf banners, but you should see In-Page Analytics data for outbound links, if it is.
If people click links on your site, you should see that in the report.
Eugen
Hello,
You could use a google chrome extention:
Google Analytics Opt-out Add-on
https://chrome.google.com/webstore/detail/fllaojicojecljbmefodhfapmkghcbnh
I leave it running all the time 😉
Peter
Hey Peter, thanks for the suggestion!
I agree that you can also use that extension, but that will block Google Analytic on all sites.
Personally, I think that as long as I want to see data about my visitors, I should also let others see data about my activity on their site.
Let’s say that I see this as a win-win situation for everyone.
I add filters to the profile to filter out all pageviews where the hostname matches the dev site address.
Exclude:
Filter Field: Hostname
Filter Pattern: dev\.example\.com
This is great for everyone who keeps a dev site.
Thanks for adding that, Adam!
Thanks for the clear instructions — really easy to follow. You learn something new everyday! Cheers Eugen
Glad you found this useful, Dawn!
Thanks!
Thanks for this post, I found it while trying to set up a clients page, I always forget how to do this in between site set ups, must get in the habbit of removing my data before working on the site 🙂
Pippa, you can bookmark this page and use it anytime you need to refresh your memory.
Eugen
First, THANK YOU so much for writing this post. However, I don’t know when this article was written because under Google Analytic account, I can’t add a filter based on IP address for some reason. May be Google have removed it. If you know where can I find it, please, let me know.
Thank you.
Thank you for explaining things so clearly (why can’t Google with its billions of turnover explain things as well? they should obviously hire you…)
Regarding the quote marks around “robots” and “noindex” – in the file I downloaded there were no quote marks, double or single, around these words – so I added them (hope I did the right thing).
Anyway thanks again Eugen and if you ever need business planning software get in touch and I’ll give you a big discount!
Eugen:
Do you know if there is a time laps of filters becoming active after you add them to GA?
Great article! thanks.
-T
Thomas, it will filter the traffic from the time you apply it.
But you can create a custom segment to filter out your own traffic from previous dates.
Hi Eugen,
I’m not getting this to work. I’ve created the Html document, changed the account to my own.
I’ve set up the filter in GA as described.
After that set up I put the the file on my server and pay it a visit from a browser on my local computer. Still I can see that my visit reflects the real-time data on GA. What do you reckon I’ve missed?
Thanks in advance =).
/Daniel
Hi @Eugen,
I followed all details, but when I go to google analytics real time I’m continuing to see myself connect to the page! How can I do it?
Thanks