In the first lesson of this course you have set up your business objective and from those objectives the goals you have for your website.
Now it’s time to add those goals into your Google Analytics account and start to measure how your website performs towards the goals you have setup in the first lesson.
But why should you track goals?
The main benefit of goal tracking is that you can measure the success of your online marketing campaigns and see exactly which one performs better.
You will be able to see which of your referrers have send you good traffic with high conversion rates or which of the pay-per-click ads have the most ROI.
Goal tracking can help you check your SEO efforts too, because you can see which of the keywords you have optimized for converts better or what SEO tactics are ineffective.
Thus, setting up goals and checking the performance of different metrics towards them are the most important activities in measuring the success of your website.
Plus, you have a total of 20 goals that you can setup, so why shouldn’t use that if it can improve your conversions.
Now, you can easily add a goal in order to:
- Measure sales
- Measure lead generation from your website
- Measure product downloads
- Measure the number of signups to a newsletter over time
- Measure visitor loyalty and recency
- Measure who pauses or fast forward on a video
- See who clicks your ads
- How many errors a visitor encounters during the checkout
What if you don’t have something to sell?
Well, that really isn’t a problem, because there is always something that can be tracked.
In web analytics you can track two types of goals:
- Macro-conversions – which are the most obvious goals of an website. For example, a macro-conversion of an eCommerce website is the visitor making the purchase.
- Micro-conversion – which are small goals, like subscribing to a newsletter, downloading a whitepaper or visiting a specific page.
Now, even if you don’t sell something, you can setup micro-conversion goals and start measure how your visitors interact with your website.
So, you can measure the success of your website not only if you sell products or services, but also if someone downloads your manifest, subscribes to your newsletter or visits your “About” page.
How to create Goals in Google Analytics
The first step in creating goals for your account is to log into your Google Analytics account and select the account of your website.
Once you do this you will be directed to the [Reports] section. From here just click the [Admin] menu from top left corner of the application.
This will direct you to the [Profile Settings] page from where you can edit website information, add or edit goals, apply filters or give access to other users to your Google Analytics profile.
At this step, just press the [Goals] tab and click the [+ Goal] link. You can choose any position or set for your goal, but as an advice, I would recommend you to organize goals by business function (group related goals together) and do not change their position in future.
Please note that if later you will change the position of a goal, GA will see it as a new goal and will not move the previous captured conversions to the new goal.
Then, follow the below instructions to add your first goal.
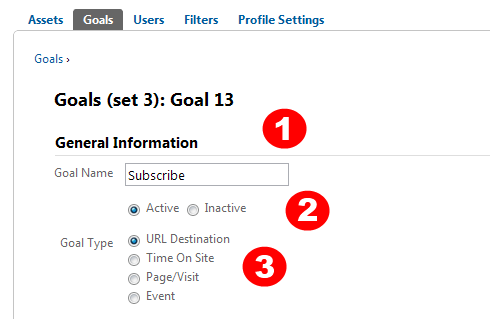
Now, you can start entering information about your goal:
1. Goal name
The name you choose here will appear in the Google Analytics conversion reports and in the custom reports you will create
2. Active Goal
This option allows you to activate or deactivate your goal
3. Goal Type
There are 3 types of goals and we will analyze each of them separately. However, the most used goal type is the URL Destination.
URL Destination
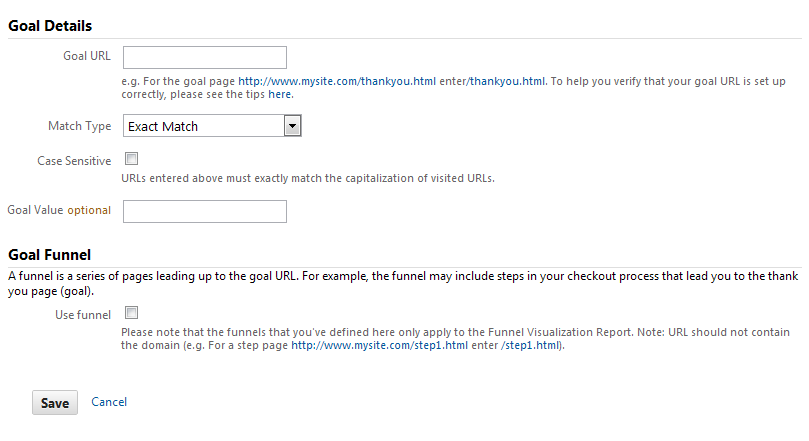
The URL Destination goal type helps you track visitors that complete a goal by visiting a specific page.
This type of goal can be used to track newsletter sign-ups, purchases, downloads or visits for a specific page. To use this type of goal, you need to create a page where you can direct all your subscribers or buyers after they complete a specific action (buy an item or subscribe).
Once your visitors reach that page, they will be tracked as conversion and you can see that in the Google Analytics reports.
When setting up this type of goal you will need to choose what match type to use. For start I would recommend you to use “Exact Match” and select the “Case Sensitive” option. This is recommended when you have friendly permalinks for your website, such as “/thank-you/” or “/thank-you.html”
In case you have generated permalinks, like “?p=43&sar=65”, I would recommend you to look more into using “Head Match” or “Regular Expression”.
Next, you will have to choose the URL of your goal, which is “/thankyou.html” in this example: http://www.mywebsite.com/thankyou.html.
One very important step is to add a value for your goal (read more below).
Additionally, you can create a funnel, which is a series of pages leading up to the goal URL. So, for example if you track the signups to your newsletter, the funnel might be [Index (step 1) > Signup page (step 2)].
Time on Site
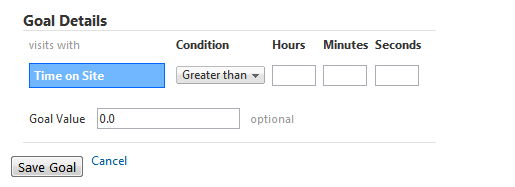
This type of goal can help you check the time a visitor spends on your site during a visit.
Personally I use this type of goal to measure my engaged visitors and I call it “Engaged Visit”. So, every person that spends on my site more than 1 minute is an engaged visitor. This goal helps me see who sends me (social media sites, forums, search engines) the most engaged visitors so I can try and leverage more those sources.
On the other hand you can also check who sends you the less engaged visitors and either do something to engage them more or focus on other traffic sources.
Pages/Visit
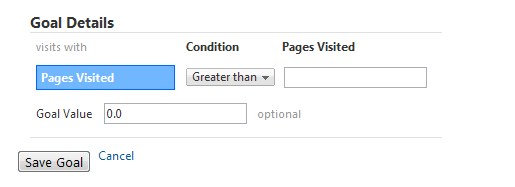
The “Pages per Visit” goal helps you check how many pages a visitor has read during a visit.
I use this type of goal to measure the visitors who take the time and read my articles (more than 2 pages) and I call it “Readers”. This helps me see who sends me readers and who doesn’t.
Event
Events allow you to measure who pauses or fast forward on a video, who clicks an ad, who downloads an eBook or how many errors a visitor encounters during the checkout.
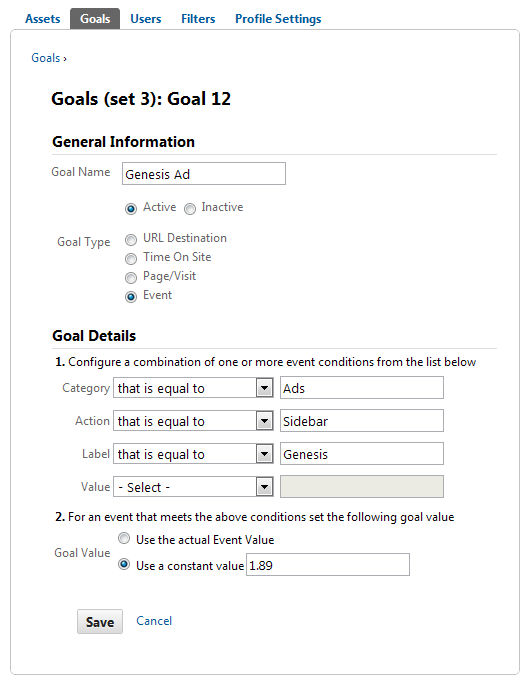
I personally use events to measure who clicks on my sidebar ads and who closes or subscribes to my Google Analytics course using the pop-up form.
To do that, you have to add onclick=”_gaq.push([‘_trackEvent’, ‘category’, ‘action’, ‘opt_label’, ‘opt_value’]);” next to your URL, just like in the example below:
< a href="https://eugenoprea.com/genesis/" onclick="_gaq.push(['_trackEvent', 'Ads', 'Sidebar', 'Genesis']);" >
To setup goals for your events, you need to add a new goal, enter it’s name and choose [Event] as a Goal Type. Then, you need to fill in it’s Category, Action, Label, and Value. For our example the Category is “Ads”, Action “Sidebar” and Label “Genesis”. I haven’t added a Value, because I use Goal Value to track it’s performance.
Here is how the above example looks into my Google Analytics account:
Not that hard, isn’t it?
Setting Goal Values
Now, for each of the above goal types you can assign goal values and this is the most interesting part, because you are able to actually measure in $$$ how well your metrics perform.
Goal values are not that hard to set. You will have to figure out how much money you can get if a visitor converts.
If you sell an eBook that costs $27, then the goal value for the eBook download would be, obviously $27.
Or, if 1 person out of 1000 visitors who visit your “About” page purchase your service which costs $200, then every visit to your “About” page would be valued at $0.2.
Or, if you track newsletter subscribers and 10 out of 100 subscribers purchase your eBook, then each signup would be valued at $2.7.
And the examples can continue…
Actually, Avinash Kaushik wrote a very interesting article about setting up values for your goals in Google Analytics and I would recommend you to take the time and read it for an in-depth research.
Your task for this lesson
Setup at least three goals in your account: Engaged Visit, Readers plus one more (Subscribe to newsletter, download a PDF or visit your “About” page).
That’s all for today! I hope you have your Google Analytics account ready and your goals setup by now. In the next lessons we will dive more into getting insights from the Google Analytics reports.
But wait! Now that you also finished the third lesson of the “Google Analytics – From 0 to Analysis Ninja” course, I want to offer you the third Shuriken. Kudos to you! You are now one step closer to becoming an Analysis Ninja.
![]()
![]()
![]()
Along the journey, you will receive one for each lesson you complete and at the end you will become a truly Analysis Ninja. Aren’t you excited about this?
I am really excited to see you participating on this course and I hope that you will get the most out of it. If you do, don’t forget to spread the word. It’s free!
In the next lessons I will show you what are the 10% features of Google Analytics that you should use to give you 90% results.
PS:
If you got here without being subscribed to the Google Analytics course, you are missing out! This is the Lesson #3 from a multi part course about Google Analytics. Click here to learn more about it and sign up to the “Google Analytics – From 0 to Analysis Ninja” course. This way, you can’t miss any lesson.
